I have been reading about various SBCs (Single Board computers) to find a suitable one to build a NAS. While doing that, I remembered I own a Raspberry Pi 1 Model B SBC. Therefore I decided to try a torrent client on the raspberry pi to find out the capabilities of my old raspberry pi.
So, I used the latest raspbian lite image (2017-01-11-raspbian-jessie-lite.img) which is a nice headless distro suitable for my experiment on a Class 10 SD card ( Kingston 32GB SDHC SDC10G2/32GB).
Then I installed the transmission client daemon as the torrent client and added a private torrent which had a good healthy swarm. I left the torrent client keep running for a while and noticed that the download speed goes down to 0 time to time. I thought this was due to the behavior of the peers. however after observing the client for a while I understood it happened time to time with a pattern.
Then I used iostat command (comes with the sysstat package) to monitor the I/O behavior and found out that the I/O Wait goes about 100% when the download speed goes to 0. So there is a relationship between the write performance and the periodic download speed drops.
Therefore I decided to benchmark the write performance on the raspberry pi. The intention was just to study the performance of the write performance of the OS (VFS + File system ) and the raspberry pi hardware combination, not the SD card performance.
The tests were done using iozone tool with different test scenarios. Each scenario was tested for a 1000MB file with 25MB, 50 MB and 100MB record sizes.
File System
|
Disk Scheduling Algorithm
|
Ext4 with journal
|
noop
|
Ext4 without journal
|
noop
|
Ext4 with journal
|
deadline
|
Ext4 without journal
|
deadline
|
Ext4 with journal
|
cfq
|
Ext4 without journal
|
cfq
|
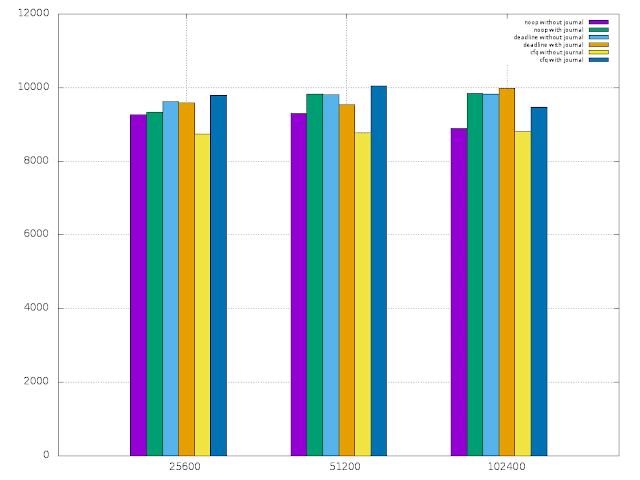
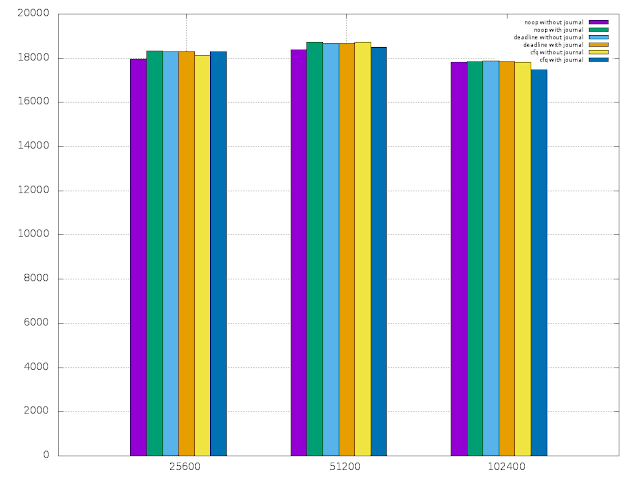
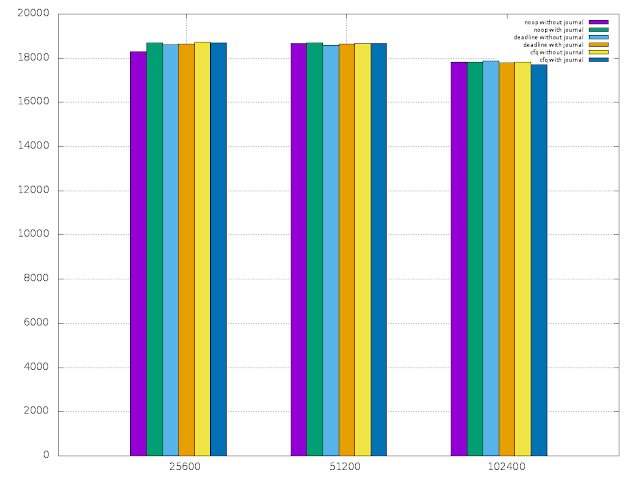
Then I plotted the read,write,random read and random write results using gnuplot.
According to the results,
- write graphs shows that the raspberry pi can handle about 10000 KB write rate. There was no significant variance in the rate with the record size.
- random write graph shows that the raspberry pi can handle 9000 KB write rate. It also shows that the higher rates can be achieved setting the higher record sizes.
- read and random read graphs show that the raspberry pi can handle about 18000 KB read/random read rate. There was no significant variance in the rate with the record size.
Therefore even though the SD card is class 10, that will not give you the actual SD card performance due to bottlenecks in Raspberry pi.
 |
| Write |
 |
| Random Write |
 |
| Read |
 |
| Random Read |
This is how I prepared the SD card for the tests,
Prepare the SD card for raspberry pi
First write the raspbian image on to the SD card using dd command,
dd if=2017-01-11-raspbian-jessie-lite.img of=/dev/sdx
Then we need to create two partitions with and without ext4 journal for this experiment. However when raspberry pi boots at first time, it expands the file system automatically to consume all the free disk space in the SD card. In order to avoid that we should disable that feature.
For that, mount the SD card and edit cmdline.txt file located in the boot partition and remove the highlighted portion from the boot parameters.
dwc_otg.lpm_enable=0 console=serial0,115200 console=tty1 root=/dev/mmcblk0p2 rootfstype=ext4 elevator=deadline fsck.repair=yes rootwait quiet init=/usr/lib/raspi-config/init_resize.sh
Create 2 partitions for tests
Insert the SD card in to the raspberry pi and boot it. Now we are able to create the two partitions we want on the SD card.
root@raspberrypi:~# fdisk /dev/mmcblk0
Welcome to fdisk (util-linux 2.25.2).
Changes will remain in memory only, until you decide to write them.
Be careful before using the write command.
Command (m for help): p
Disk /dev/mmcblk0: 29 GiB, 31104958464 bytes, 60751872 sectors
Units: sectors of 1 * 512 = 512 bytes
Sector size (logical/physical): 512 bytes / 512 bytes
I/O size (minimum/optimal): 512 bytes / 512 bytes
Disklabel type: dos
Disk identifier: 0x244b8248
Device Boot Start End Sectors Size Id Type
/dev/mmcblk0p1 8192 137215 129024 63M c W95 FAT32 (LBA)
/dev/mmcblk0p2 137216 2715647 2578432 1.2G 83 Linux
Command (m for help): n
Partition type
p primary (2 primary, 0 extended, 2 free)
e extended (container for logical partitions)
Select (default p): e
Partition number (3,4, default 3):
First sector (2048-60751871, default 2048): 2715648
Last sector, +sectors or +size{K,M,G,T,P} (2715648-60751871, default 60751871):
Created a new partition 3 of type 'Extended' and of size 27.7 GiB.
Command (m for help): p
Disk /dev/mmcblk0: 29 GiB, 31104958464 bytes, 60751872 sectors
Units: sectors of 1 * 512 = 512 bytes
Sector size (logical/physical): 512 bytes / 512 bytes
I/O size (minimum/optimal): 512 bytes / 512 bytes
Disklabel type: dos
Disk identifier: 0x244b8248
Device Boot Start End Sectors Size Id Type
/dev/mmcblk0p1 8192 137215 129024 63M c W95 FAT32 (LBA)
/dev/mmcblk0p2 137216 2715647 2578432 1.2G 83 Linux
/dev/mmcblk0p3 2715648 60751871 58036224 27.7G 5 Extended
Command (m for help): n
Partition type
p primary (2 primary, 1 extended, 1 free)
l logical (numbered from 5)
Select (default p): l
Adding logical partition 5
First sector (2717696-60751871, default 2717696):
Last sector, +sectors or +size{K,M,G,T,P} (2717696-60751871, default 60751871): +14G
Created a new partition 5 of type 'Linux' and of size 14 GiB.
Command (m for help): p
Disk /dev/mmcblk0: 29 GiB, 31104958464 bytes, 60751872 sectors
Units: sectors of 1 * 512 = 512 bytes
Sector size (logical/physical): 512 bytes / 512 bytes
I/O size (minimum/optimal): 512 bytes / 512 bytes
Disklabel type: dos
Disk identifier: 0x244b8248
Device Boot Start End Sectors Size Id Type
/dev/mmcblk0p1 8192 137215 129024 63M c W95 FAT32 (LBA)
/dev/mmcblk0p2 137216 2715647 2578432 1.2G 83 Linux
/dev/mmcblk0p3 2715648 60751871 58036224 27.7G 5 Extended
/dev/mmcblk0p5 2717696 32077823 29360128 14G 83 Linux
Command (m for help): n
Partition type
p primary (2 primary, 1 extended, 1 free)
l logical (numbered from 5)
Select (default p): l
Adding logical partition 6
First sector (32079872-60751871, default 32079872):
Last sector, +sectors or +size{K,M,G,T,P} (32079872-60751871, default 60751871):
Created a new partition 6 of type 'Linux' and of size 13.7 GiB.
Command (m for help): p
Disk /dev/mmcblk0: 29 GiB, 31104958464 bytes, 60751872 sectors
Units: sectors of 1 * 512 = 512 bytes
Sector size (logical/physical): 512 bytes / 512 bytes
I/O size (minimum/optimal): 512 bytes / 512 bytes
Disklabel type: dos
Disk identifier: 0x244b8248
Device Boot Start End Sectors Size Id Type
/dev/mmcblk0p1 8192 137215 129024 63M c W95 FAT32 (LBA)
/dev/mmcblk0p2 137216 2715647 2578432 1.2G 83 Linux
/dev/mmcblk0p3 2715648 60751871 58036224 27.7G 5 Extended
/dev/mmcblk0p5 2717696 32077823 29360128 14G 83 Linux
/dev/mmcblk0p6 32079872 60751871 28672000 13.7G 83 Linux
Command (m for help): w
The partition table has been altered.
Calling ioctl() to re-read partition table.
Re-reading the partition table failed.: Device or resource busy
The kernel still uses the old table. The new table will be used at the next reboot or after you run partprobe(8) or kpartx(8).
root@raspberrypi:~# partprobe /dev/mmcblk0
root@raspberrypi:~# lsblk
NAME MAJ:MIN RM SIZE RO TYPE MOUNTPOINT
mmcblk0 179:0 0 29G 0 disk
├─mmcblk0p1 179:1 0 63M 0 part /boot
├─mmcblk0p2 179:2 0 1.2G 0 part /
├─mmcblk0p3 179:3 0 512B 0 part
├─mmcblk0p5 179:5 0 14G 0 part
└─mmcblk0p6 179:6 0 13.7G 0 part
Create file systems on the partitions
Create a ext4 file system without a journal,
root@raspberrypi:~# mkfs.ext4 -O ^has_journal /dev/mmcblk0p5
mke2fs 1.42.12 (29-Aug-2014)
Discarding device blocks: done
Creating filesystem with 3670016 4k blocks and 917504 inodes
Filesystem UUID: 70fbac8c-4b68-4f53-aacb-12c2f84022ba
Superblock backups stored on blocks:
32768, 98304, 163840, 229376, 294912, 819200, 884736, 1605632, 2654208
Allocating group tables: done
Writing inode tables: done
Writing superblocks and filesystem accounting information: done
Create another ext4 file system with default options,
root@raspberrypi:~# mkfs.ext4 /dev/mmcblk0p6
mke2fs 1.42.12 (29-Aug-2014)
Discarding device blocks: done
Creating filesystem with 3584000 4k blocks and 897600 inodes
Filesystem UUID: 3d5c4292-3aa6-49c8-a0e9-4fa7f0d484e3
Superblock backups stored on blocks:
32768, 98304, 163840, 229376, 294912, 819200, 884736, 1605632, 2654208
Allocating group tables: done
Writing inode tables: done
Creating journal (32768 blocks): done
Writing superblocks and filesystem accounting information: done
Then mount the partitions,
mkdir /no_journal /with_journal
root@raspberrypi:~# cat /etc/fstab
proc /proc proc defaults 0 0
/dev/mmcblk0p1 /boot vfat defaults 0 2
/dev/mmcblk0p2 / ext4 defaults,noatime 0 1
/dev/mmcblk0p5 /no_journal ext4 defaults,noatime 0 0
/dev/mmcblk0p6 /with_journal ext4 defaults,noatime 0 0
root@raspberrypi:~# mount -a
iozone utilitiy
Download iozone source code and compile it to build the tool.
wget http://www.iozone.org/src/current/iozone3_465.tar
Note: I changed MAXBUFFERSIZE constant defined in the iozone.c file in order to have larger record sizes. by default it supports only for 16MB record sizes.
References,


